|
There are exercises that are considered bad. Some because they can cause injury, others because they are just plain ridiculous. I’m sure you have seen some on YouTube that make you cringe! But there are also a lot of exercises that fall into a “gray” area. The gray area is more dependent on the specific individual performing the exercise. One exercise that is bad for one person might be great for another and vice versa. This is where exercises can get a bad rep. let’s review some common examples.
Most overhead pressing is considered a huge no no within the general population, and for good reason. Pressing a barbell from the front of your shoulders to an overhead position is usually contraindicative for much of the general population, which means from the back of the shoulders would be even worse. A competitive weightlifter that performs exercises such and the clean & jerk and snatch will on the other hand most definitely have to be able to overhead press to compete at their sport. Athletes that have developed the ability to do this exercise safety will use overhead pressing as a staple of their training program. There are two very different people, a desk jockey and a professional weightlifter. They probably will not and should not be performing the same exercises. It is much more important that the exercise is appropriate for the specific individual than just calling it a bad exercise. Again, there is a gray area for many exercises. The back squat is the king of exercises. Just ask anyone that trains high school football players. The back squat is without a doubt one of the best exercises to develop strength and athleticism. This does not mean it is appropriate for everyone. There are more people who have no right back squatting than the other way around and that includes high school football players. Can the individual perform a bodyweight squat with their thighs pass parallel? If not, then the person should not be performing a back squat. There are many things that an athlete can work on so they can perform the back squat, but those things have to come first. To find the true reason why someone cannot perform a back squat a battery of tests would have to be performed to assess the reason for the limitation. Once that is done and the individual performs the necessary steps then back squatting can be added to the training program. A simple rule when deciding if someone is capable of performing an exercise is to have them execute it with just their bodyweight. If they pass, feel free to add that exercise, if they don’t, find a way to fix it. There are also times when unfortunately you probably should not perform a certain exercise ever again. If you are a desk jockey and herniated a few disks, deadlifting might be out for some time, if not for good. I for one always look for variations of an exercise to see if it would work. With this example single leg deadlifts might be able to be added back in eventually. And if I had to choose between no deadlifting and the single leg variation I am taking the later every time. What it really comes down to is if an exercise is appropriate for the certain individual, not if the exercise is good or bad necessarily. An exercise can only be bad if one is not capable of performing with proper form.
1 Comment
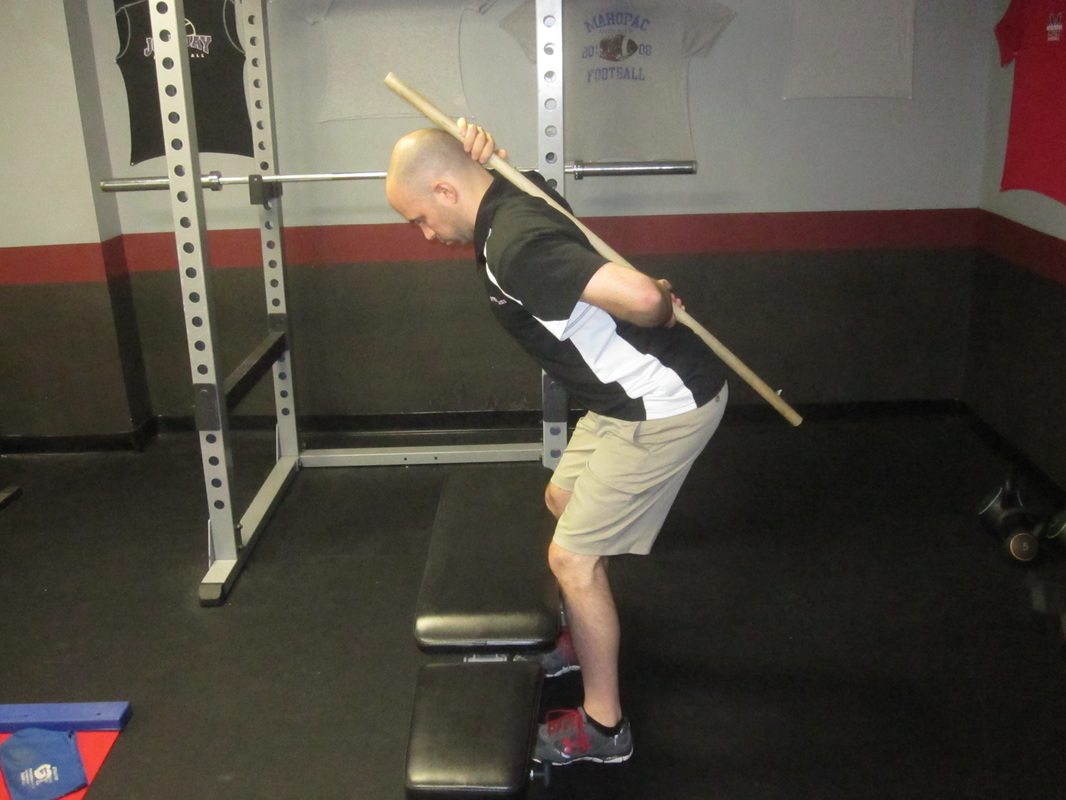
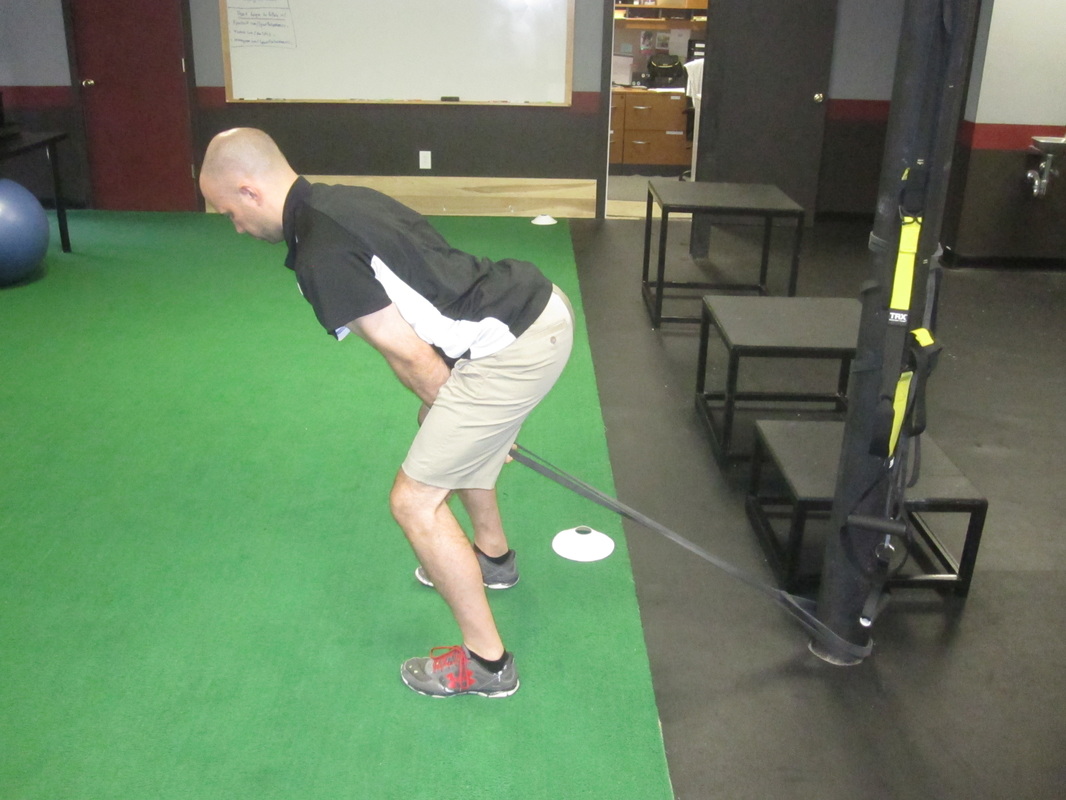
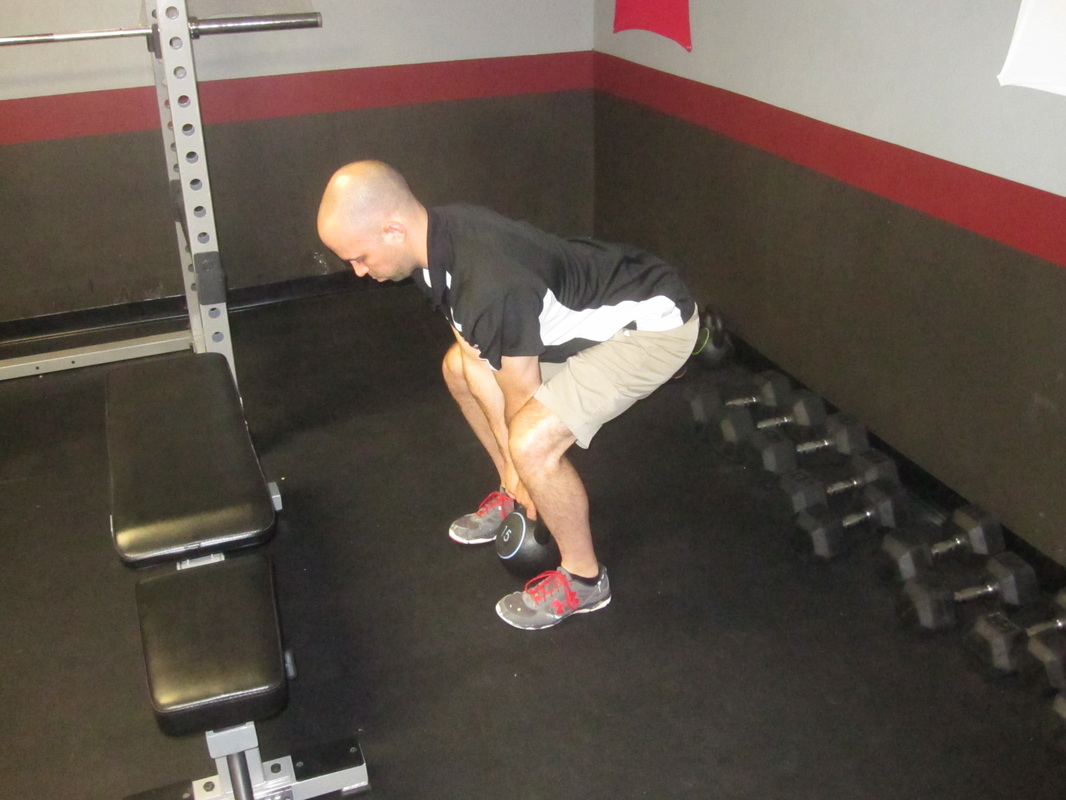
The deadlift is one of my favorite exercises for building raw strength. It is up there with one of the best exercises you can have your athletes perform. There are many options that you can choose from. You could always use the conventional deadlift with a barbell, Romanian deadlift, sumo deadlift or one of my personal favorites, the trap bar or hex bar deadlift. Either one you choose it is a win in my book. Most young athletes walking into the training facility for the first time have no business even looking at a deadlift, let alone trying to perform the movement. They cannot even hinge their hips! So that leads to the question, how do we teach the deadlift to athletes that cannot even properly hinge their hips? There are many options that I like to use in unison and some by themselves. Here are my top three ways to teach the deadlift. 1. Hip Hinge w/ Dowel & Bench. Have an athlete place a dowel along their spine. The dowel should run from the back of their head to their tail bone. One hand holds the dowel behind the head and above the tail bone. Have the athlete take a shoulder width stance with their feet underneath a bench. The bench is used to force the athletes to hinge their hips and not make the movement from their knees. The athlete should pack their neck, which means they should keep their chin tucked. Make sure the athlete keeps three points of contact with the dowel at the head, upper back and tail bone. 2. Pull Through w/ Band or Cable. Have the athlete grab the band or cable attachment (rope attachment). Take a few steps forward so there is tension on the band or cable. Have the athlete hinge their hips back while keeping a neutral spine. The hands should come to the middle or the athletes legs. The pull from the band or cable somewhat forces the hip hinge to take place if it is not totally there yet. Instruct the athlete to drive through their heels and extend their hips. 3. Kettlebell Deadlift. When this movement is used it should mean that the athlete is hinging their hips properly and do not need physical feedback or assistance. The athlete should set up the kettlebell between their ankles, hinge their hips back, grab the kettlebell and perform the deadlift. This three step process can take one day, week, month or season. It does not matter how long it takes, but it must take place before any athlete is allowed to perform a deadlift using any bar. Your athletes will move better, reduce their chance of injury and get stronger if this progression is followed
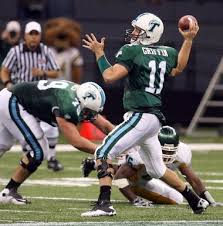
Everyone loves doing what they are good at, whether it be push ups, squats, deadlifts or any other movement. But ask yourself, how much better are you making yourself if you always focus on your strengths. If you have a great looking squat and your deadlift is lagging behind try taking a few weeks or months to focus on bring your deadlift up to par. I’m not saying don’t squat, but make the focus getting good at deadlifts. Ask yourself what it is about the deadlift that you struggle with. Is it the lift off, lock out or something else? Make a program focused on bring up your weakest link. As it pertains to the deadlift let’s say that you struggle with your lock out. You might want to start with adding in more heavy rack pulls higher up on the thigh. What if you are a bit slow off the floor? Maybe you need to throw in some speed work with lighter weight. Is your upper back strong enough to lift big weighs? If not, throwing in some more rows and chins into your program will help. At the same time there should always be balance in your training program. An example of this would be those that love to bench press (you know who you are!), but maybe sneak in a pulling exercise once or twice a month. This will lead to weaknesses and imbalances creeping in. The last thing you want is to be injured from a training program that is unbalanced and poorly written. For our athletes out there this is also extremely important. During the season, depending on your sport, attention should be paid to what imbalances and weaknesses usually show themselves during your season. If you are a quarterback your plant foot and throwing arm will be getting more work during practice and games. This could lead to overuse injuries if not cared for during the season. An in season training program needs to focus on preventing the opposite limbs from lagging behind and also making sure overuse injuries do not present themselves in the more active limbs.
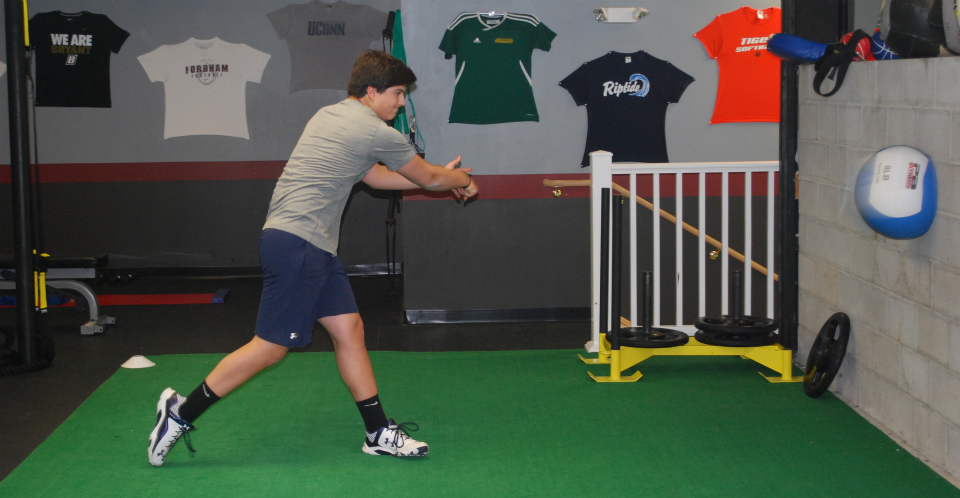
Make sure you are working with your performance coaches to have the best chance at avoiding injuries. It is up to you to make sure your weakest links are brought up to par, if not you will always be held back from your true potential and possibly on the side lines with an injury. The split stance perpendicular medicine ball scoop is one of my favorite medicine ball (MB) exercises for developing sport specific power. It is a great movement because it relates so well to most sports and is very specific to how athletes produce power during competition. Coaching Cues
· Assume a split stance with the back heel off the ground. · Begin by slightly dropping the front knee towards and ground. · As the knee is dropping start rotating your thoracic spine (upper back). · Keep your eyes on the medicine ball the whole time. · After the slight knee drop and thoracic spine rotation explode up by driving through the front heel and forcefully extending the hips. · Scoop the medicine ball into the wall and be ready to catch it on the bounce back. Picture a hockey player skating up ice, a baseball player stealing 2nd base, a basketball player dribbling by an opponent, it is going to look very similar to this specific MB exercise. Each player will load their posterior chain by making a slight dip and then explode out of that stance. Any athlete that moves their feet into a split stance can use this exercise to develop sport specific power. Try doing 3 sets of 6-8 repetitions per side to develop sport specific power. Power is a quality that every great athlete needs to possess in order to excel at their sport. It is the final touches that propel good athletes into great ones. Without a doubt, this is an area that an advanced athlete needs to pay great detail and attention to. The questions that have to be asked are how and where does this power need to be applied. Does it involve rotational or linear movement? Those will be the questions that I look to answer for sport specific power development. first things first, the greatest amount of power that can be produced is transferred through the ground up through the lower body. When an athlete exhibits a tremendous amount of power, whether throwing, kicking, hitting, tackling or any other form, that power is produced by applying explosive force through the ground. Power and force are inversely related but are still components of one another. Bottom Line: Develop strong explosive wheels to produce tremendous amounts of power. What you need to produce the power against will usually dictate what direction you need to train power. If you are tackling an opponent you will most likely train power in the sagittal plane or perform a linear movement. If you are moving an object such as swinging a racket or throwing a football you will be training power in the transverse plane which is a rotational movement. Bottom Line: Power development should be sport specific for the advanced athlete. Ok, so we answered the how it needs to be produced and where it has to be applied. How about what should we do to train those sport specific power movements. Training power in the sagittal plane could involve movements such as box jumps, power cleans and snatches. These movements are all preformed in the sagittal plane and would be great exercises for a hitter (volleyball), power forward (basketball) or offensive guard (football). Athletes that need to train power in the transverse plane would use a variety of medicine ball rotational throws, scoops and slams. These would be great for our pitcher (baseball), quarterback (football) or golfer (golf).
Bottom Line: Power exercises should be selected based on the sport and position you play. Remember this topic is about advanced athletes. There is nothing wrong with a twelve year old quarterback working on rotational power, but let’s not get carried about getting to sport specific at a young training age. Let the athletes develop and learn, then master the basics. As for our advanced athletes sport specific training is key to their success. Let’s start by answering the question, what is the bilateral deficit? The bilateral deficit is the thought that one can produce more force, and power for that matter, on one leg rather than two, when both of the single leg totals are combined. So if that is the case everyone should drop bilateral movements and go with its unilateral counterpart, right? Before we make that leap let’s review the pros and cons of both.
Although you can discuss the bilateral deficit for both the upper and lower body I will be sticking with the lower body and using the squat for comparison. This is the most heavily debated area of the bilateral deficit so I see no reason to stray from the topic. The bilateral deficit is now an additional part of an argument that has been being made for using unilateral squat variations long before it was even a hotly debated topic in the strength and conditioning world. Below is my review of both squat variations. Bilateral Squat -There is a greater amount of force produced during the movement with both legs pushing equally. Along with a greater amount of force being produced a greater anabolic hormonal response will take place. -Having both legs working at the same time does not limit one’s ability to produce an equal amount of force on the second leg as with the unilateral squat variation. Unilateral Squat -The unilateral squat, and for this discussion, the rear foot elevated split squat (RFESS) is the movement of choice when selecting an exercise from this category. The RFESS avoids the pelvis from going into a posterior tilt. This means your hips do not disappear underneath you. This will protect the vertebrae of the lumbar spine from any flexion taking place. This is my #1 reason for choosing this movement over the bilateral squat if I am only going to choose one version. - The words “sport specific” gets tossed around like political correctness nowadays, but nonetheless it is worth bringing up. Is a unilateral squat more sport specific than a bilateral squat? That is certainly a possibly, although I think the term is grossly overused and should only be used when mastery of the basics takes place for any athlete. With that being said a split squat is one of the basics that an athlete should master. So is it more sport specific or not? I think if you polled 100 strength and conditioning coaches it would favor saying it is sport specific, maybe 70/30. -Athletes, especially younger athletes and if we want to get even more specific, younger, male athletes struggle immensely with the bilateral squat. I am not referring to loading weight on the barbell, but a body weight squat. The athlete lacks the mobility and stability to perform a body weight squat in most cases. This is likely due to a number of factors, but a huge one being that puberty is taking place and growth is making things “tight”. At this time the split squat is a much better option. So at the end of the day it is not necessarily the bilateral deficit that is going to make me choose a bilateral or unilateral squat pattern, but the athlete’s ability to do either movement. I personally include both variations for my athletes based on what I have previously mentioned. What squat variations are you having your athletes perform? Starting a new training season is an exciting time. Whether it is the off-season, pre-season or in-season there will be a new focus and a refreshing mind-set. This is a chance to focus on other training qualities that are important to your overall athletic development. Although each aspect of a quality training program, such as power and strength, will always be taking place, there will be different variables that are being manipulated from season to season. For example the off-season is the best time to make gains in strength and power. The time to focus on training and quality nutrition is at its highest. It is also the time of year where your ability to recover will be at its best which will give you your best chance to make gains. During the in-season you are trying to maintain your gains that you made during your off-season training program. Duration of training time and amount of training days will be reduced. This will allow for more focus being directed to practice and game time. Performance training should take place during all seasons of the year, but different variables will be taken in to consideration. Below is a list of variables to think about when looking at designing a year round training program with a few simple examples. This is by no means an all inclusive list, but it is some of the most important variables to think about. Volume- How much work will be done in a given training session Example: 5x5 at 275 is a greater training volume than 5x3 at 315 Greater training volumes are used in the off-season Intensity- At what percentage of the repetition maximum is the set being done Example: 5x3 at 315 is a greater training intensity than 5x5 at 275 Intensity reaches its peak before a sport season starts Exercise Selection- What exercise is selected for the training day Example: Split squat vs. slide board reverse lunge Selection is based on the athlete, sport, ability, experience, etc Repetitions – How many times a given exercise is performed Example: 6 vs. 15 repetitions Repetition Continuum Strength/Power Hypertrophy Muscular Endurance 1 5 10 15 20 This hopefully gives you a short example of some of the things that go into designing a year round training program. If you would like to learn more above designing year round training programs let me know! The power clean is a staple in most high school and collegiate training facilities. In my opinion it is the best option to develop explosive power while training with everything else being equal. Unfortunately it is a very coaching intensive exercise that requires a qualified coach to make the exercise useful and safe. Here are five coaching cues that will help you teach your athletes to perform the power clean more efficiently.
1. Do Not Start With The Power Clean. There has to be a teaching progression when coaching any new exercise, especially one as complex as the power clean. Does the athlete have a hip hinge, great, then how about learning the power shrug, how does that look?, good, great, how about teaching the squat jump next. Have they learned how to catch yet? That is important too. Start with the bar in the hang position first and not from the floor. Again, everyone wants to put the carriage before the horse. SLOW DOWN! Take your time teaching your athletes the proper way to do things. 2. Tell Your Athletes To Wrap Their Wrists Around The Bar. This cue helps tremendously with the athletes learning to pull the bar into their body. When the bar drifts out in front of the body you have to jump forward to catch it. This will also limit your ability to produce power because you are likely bending your elbows to soon, which leads to tip #3. 3. Once The Elbows Bend The Power Ends. This is why it is so important to teach proper progressions. A perfect time to work on locking the elbows out is when the athlete is practicing their power shrug or jump squat. This is huge for not leaking out energy during the 2nd pull. 4. Punch The Elbows Up As You Catch The Bar. I cannot tell you how many times I have seen athletes catch the bar with their elbows pointed down to the ground. This is an easy way to stress the delicate structures surrounding the elbow and put a great deal of stress on the wrist as well. The upper arm should be parallel to the floor when the catch is completed. 5. Catch The Bar In An Athletic Stance. For some reason most athletes when learning the power clean do a great job at getting their knees and hips in front of them. If you cannot picture that, imagine someone doing the limbo and trying to get under a rope. Cue your athletes to finish in an athletic stance, with a little bend in the knees and hips. If you put these five tips into coaching your athletes to perform the power clean I promise you will see results. Let me know if there are any other tips for the power clean that you incorporate into your teaching methods. If you are an athlete you must understand the difference between performance training and working out. If you do not know how to answer the question that is fine, I am going to go over it. There is just a slight difference in terminology, which most people will pay no attention to, but this difference will produce greater results in the training facility.
When I use the term performance training I am referring to an actual program or plan that is put together for a certain athlete to accomplish their specific goals. It can be a weekly, monthly, quarterly, yearly or even a multi-yearly training program. If you are just starting out begin with a weekly or monthly training plan. Focus on movement quality and getting stronger. Map out what your goals are each time you walk through the doors, what exercises you are going to do and the set & rep scheme you are going to use, among others things. There is a set of goals and plan to get those goals accomplished. On the other hand, if an athlete goes to a training facility to get in a workout, there is no plan. It is total randomness. Sure you might know what exercises you like to do so chances are you will do them again, with the same reps, sets and weights. This will work for the novice that is just starting out, pretty much anything will. Then what? After awhile you stop seeing results and get discouraged. The results stop coming and you wonder why squatting 135 lbs for 10 over the past 6 months has not promoted any changes. Let’s stop with all the working out and guess work and get on a properly designed training program that works! A performance training program gives us direction and tells us what we are trying to accomplish in a certain time frame. For example a college football player in part of his off-season might be in a hypertrophy phase, where he is trying to add muscle mass. Depending on the time of year there will be certain focuses for higher level athletes. These athletes are most likely on a yearly training program. In its simplest terms when there is a training program there is a plan. There are a set of goals that you are trying to accomplish each and every time you walk into the training facility. There is progress being made, even though at times it can be slow, it will take place. When you go to school or work there is a plan and set of goals that need to be accomplished over the day, week, month, quarter and year. A performance training program is no different. If you are serious about being the best athlete you can be, having a performance training program is a must. Set goals, map it out and get to work! There must be structure within a high school weight room. If there is not proper programming, coaching and supervision bad things will happen fast! Things must be planned for and be appropriate for the athletes. Unfortunately having an ideal situation in a high school weight room is few and far in between. This is mainly due to budgeting issues. Hiring a full time performance coach and the proper training equipment does cost money. To get around the issue of spending extra money most high schools will have the physical education teacher or sport coach run the weight room. This is not an ideal situation, but it is where most high schools find themselves.
Here are five things you can do as a physical education teacher or sport coach to make your time in the weight room safe and productive for your athletes. 1. Have Structure. There must be a plan in place to follow so when the athletes show up you look like you know what you are doing. There has to be credibility on your part as the one that is the acting performance coach. Athletes should be paired appropriately with other athletes to make things run smoothly. Each athlete should have their own pen and tracking sheet. Each athlete should respect the space and equipment that they are using. This is not the time to be horsing around, that is how injuries take place. Every weight room will have its own needs based on numbers, space, equipment and coaches, but make sure there is structure and things run smoothly. 2. KISS (Keep It Simple Stupid). Teach what you know. If you do not know how to teach it DO NOT attempt to teach it! If you do know how to teach an exercise, but the athlete is not physically capable of performing the movement and you do not know how to fix it with other exercises DO NOT make the athlete perform the exercise! This seems like common sense, but is done 99.9% of the time. Teach what you know and keep it simple. 3. Program Appropriately. The majority of high school athletes could do quite well on a bodyweight routine for some time when starting out. Others might be ready for more challenging things. Whatever the case is make sure that the program is appropriate for the athlete. 4. Assign Weight Numbers or Percentages. The majority of athletes in the weight room will be boys. Every high school boy thinks they are stronger than they really are and want to lift the heaviest weights possible. When this takes place serious injury and missed playing time will likely follow. By assigning weights you will decrease the chance of an injury happening because a young boy will not be able to randomly choose how much he would like to lift. Percentages could be used for old athletes that have a few years of training under their belt and testing is more appropriate. 5. Track Progress. To make progress there needs to be a way to track training sessions to make improvements. This is as easy as having each athlete have their training program printed out and giving them a pen. This might seem obvious, but with high school athletes you need to stress to them that they actually have to fill in the sheet before they leave the weight room. Keep track of numbers and measure the progress that is being made so consistent gains can be made. |
Archives
July 2024
Categories
All
|
Proudly powered by Weebly

 RSS Feed